FREE counter and Web statistics from sitetracker.com

Saturday, May 29, 2010

the end of an evening

To finish off Tott’s end-of-the-first-year-of-law-school dinner, we served a lemon crème brulee that the folks at Briarwood paired with an Elderton Semillon.

We chose crème brulee for a couple of reasons. We’d had several successes in the past. The custard could be made beforehand. And, of course, everyone loves crème brulee and thinks it is fancy.
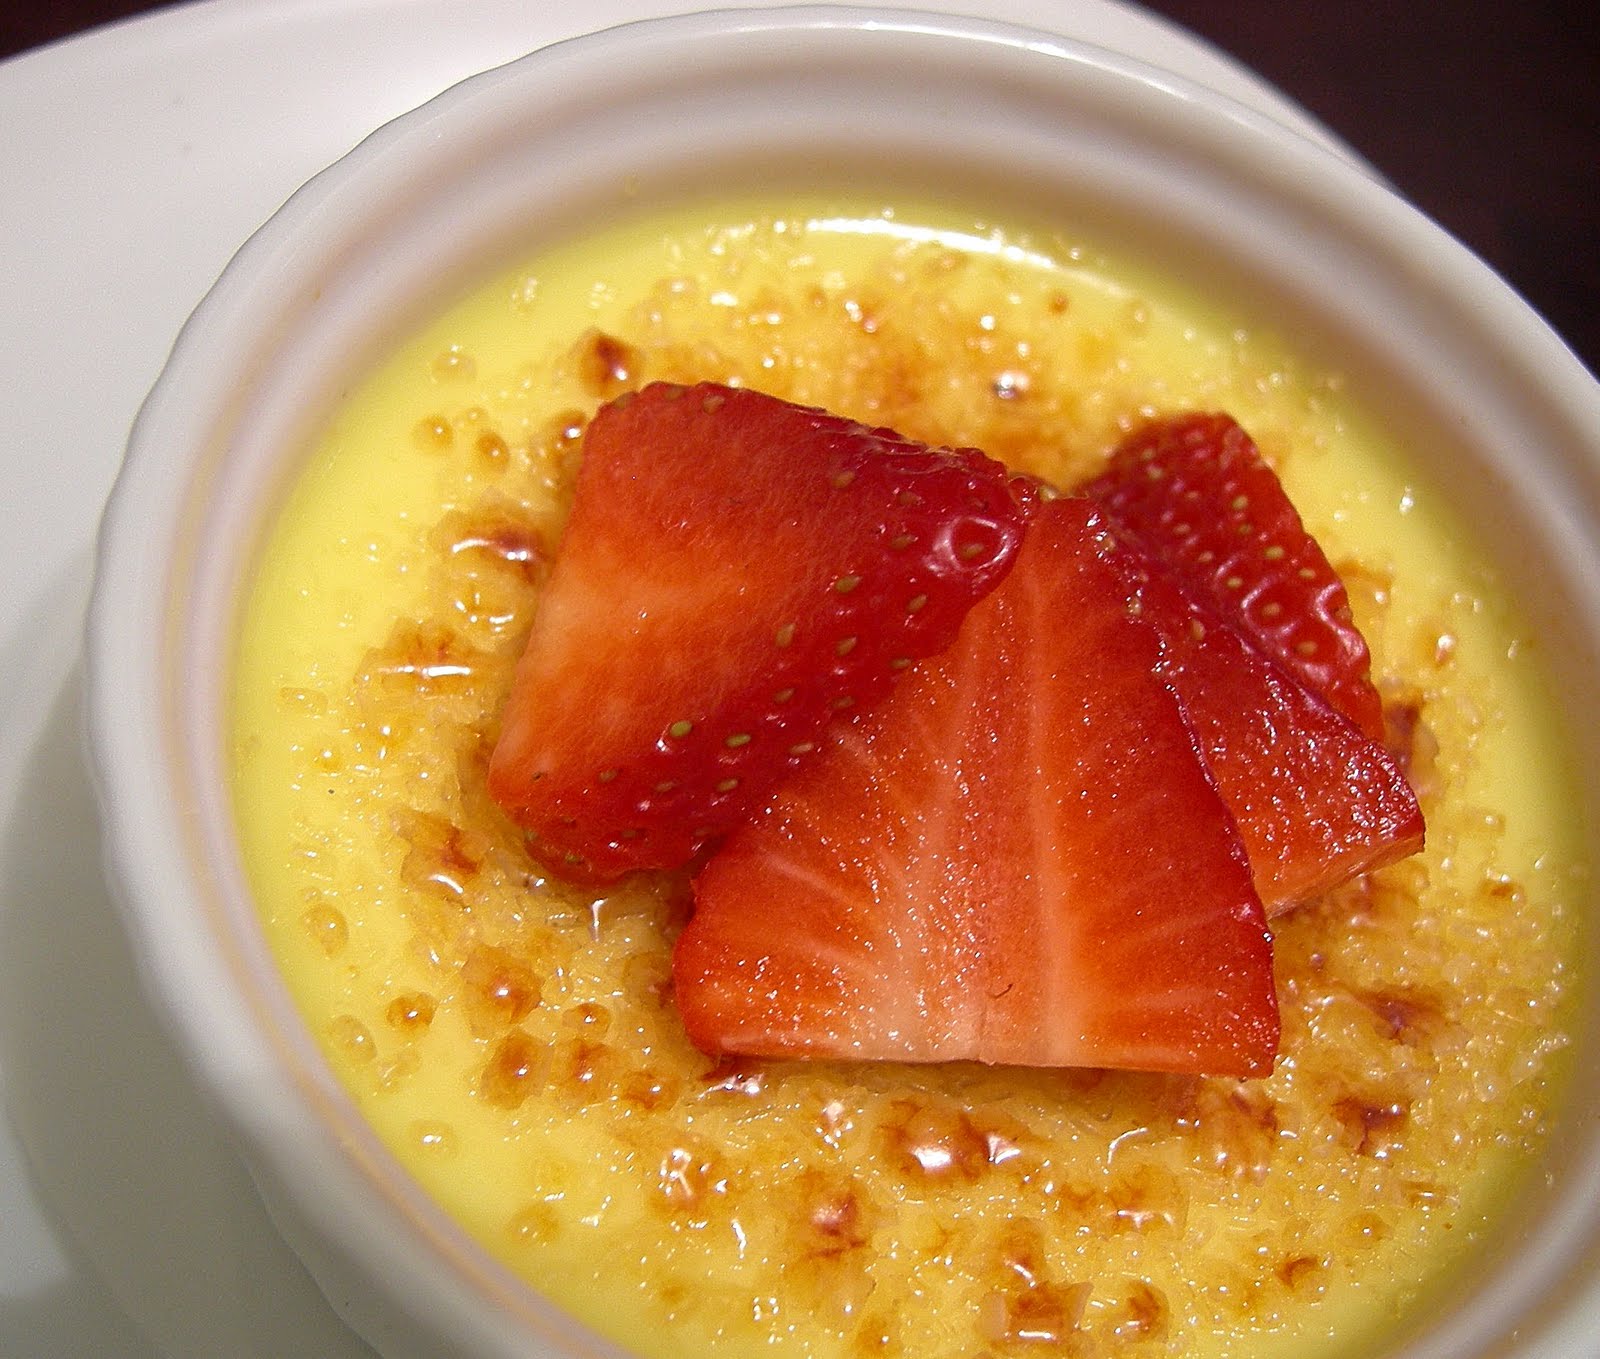
Lemon Crème Brulee
(makes 8 servings)

2 lemons
3 cups heavy cream
7 Tbs white granulated sugar
6 large egg yolks
½ tsp vanilla
about 8 tsp turbinado sugar
8 crème brulee ramekins
1 blowtorch

Preheat the oven to 325. Make sure the oven rack is in the middle position.

Zest the two lemons and combine the zest with the cream in a heavy saucepan. Stir in the white sugar and a pinch of salt. (Save the zested lemons for juice later.)

Heat the mixture, stirring occasionally, over medium-low heat until it is almost boiling. Remove it from heat. Allow it to cool to room temperature, and then cool in the fridge for 2 or 3 hours. (You don’t have to do this step of cooling it in the fridge, but if you do, the lemon flavor will be stronger.)

Remove the cream mixture from the fridge and place it over medium-low heat. Once again, stir occasionally as it warms, and remove it from the heat just before it boils.

Lightly beat the yolks in a heatproof bowl. Gradually whisk in the cream. Just slowly drizzle it into the yolks while you are whisking quickly. This should prevent the eggs from curdling.

Pour the custard mixture through a wire colander to strain out the zest and any cooked yolk. Stir in the vanilla and 1 tsp fresh lemon juice.

Divide the custard evenly among the 8 ramekins.

Arrange the ramekins in a roasting pan. Place the pan on the oven rack, and pour in water until the water level is about halfway up the sides of the ramekins.

Bake 30 to 40 minutes. The custard will be set around the edges, but the centers should wobble when the ramekins are wiggled.

Carefully remove the roasting pan from the oven. (I bumped the edge of the stove and ruined two custards when the water bath spilled into them. I was able to save two others by carefully soaking up the spilled water off the tops of the custards with paper towels.)

Cool the custards in the water bath for 20 minutes, then chill uncovered in the fridge for 4 hours.

Just before serving, evenly sprinkle the turbinado sugar over the tops of the custards. Use your blowtorch to melt and caramelize the sugar. Keep the torch moving to avoid burning the sugar.

Wednesday, May 26, 2010

greater tuna

It’s about time we got some seared tuna on this blog. (Actually, my mom put a recipe on here, but I didn’t get to taste it.) This was the main course of Tott’s celebration dinner: seared tuna with a beurre blanc over rice, sautéed snow peas, and ginger pureed carrots.

Step 1: Get some good tuna. Sushi-grade – because the middle of this is going to just on the rare side of raw. But if you have good tuna, that will be delicious. (By the way, my favorite way to get good fish is to make friends with a restaurant kitchen manager. Retail is for suckers.)

Orange-Ginger Seared Tuna
(4 light servings)

1 lb sushi-grade tuna (2 steaks)
2 oranges
2 Tbs soy sauce
5 quarter-sized slices of fresh ginger
¼ tsp Sriracha hot chili sauce
1 dash sesame oil
Black pepper

Make your marinade. Zest about half an orange into a bowl. Squeeze the juice from both oranges into said bowl. Add everything else (except the tuna), and stir it all together.

Put your tuna in a Ziploc bag. Dump in the marinade. Squish around to ensure even coverage. Marinate the tuna in the fridge for 45 minutes to an hour.

I seared the tuna in a cast iron skillet. The trick is to make it very hot. Heat the pan on high until it begins to smoke a little. Add just a bit of oil to just barely coat the pan.

Remove the tuna from the marinade, making sure the ginger slices don’t stick to the fish. Lay the tuna on one side and cook for 1-2 minutes. Flip the tuna, and cook for another 2 minutes.

Slice thinly and fan over a bed of rice. We topped this off with a beurre blanc (which made it richer and fancier), but Kaytie made the sauce, so you’ll have to wait for her to post that recipe.

Sunday, May 23, 2010

the perfect food

Mark Bittman calls the scallop one of nature’s most perfect foods. (I know this because we’ve been cooking a lot out of his Minimalist Cooks at Home cookbook. Great recipes.) I agree with him. Who doesn’t love scallops?

That’s why we chose a seared scallop as an amuse bouche for Tott’s fancy dinner.

Kaytie really should be writing this post, since she made the stuffing, sautéed the spinach, and whipped up the delicious sauce. (All I did was stuff and sear the scallops.) But she’s taking a nap right now. You snooze, you lose, baby. Plus, I really like how the scallop in the picture looks like a monster. A delicious little monster.

(I do hope she’ll post the recipe for her beurre blanc, though. It was incredible.)

Seared Stuffed Scallops over Sauteed Spinach
(an exercise in alliteration)

Scallops: Since we served this as a quick appetizer, we only served one scallop per person. (A total of five.) If you want to serve this as an entrée, then you will, of course, need more scallops. Mark Bittman recommends 1 ½ pounds for 4 servings. You’ll probably need to double the stuffing recipe.

Stuffing
1 handful fresh basil leaves
1 very small garlic clove
½ tsp salt
¼ tsp pepper
juice of ¼ lemon
1 Tbs olive oil

Mince the basil, garlic, salt, and pepper together until everything is very finely chopped – almost a puree. Mix in the olive oil and lemon juice to make a paste.

To stuff the scallops, cut horizontally almost all the way through the scallops. They’ll open up like a clamshell. Spread a little dollop of the stuffing inside each scallop, and close them.

Place a large skillet over high heat for a little while. I used our trusty cast iron skillet and waited until it was smokin’ hot.

Add a couple tablespoons of olive oil to the pan.

Add the scallops one at a time. Let them brown for 1 or 2 minutes. Carefully flip them over to brown the other side for another 1 or 2 minutes. These need to be served quickly, so they’re nice and hot.

While I was searing the scallops, Kaytie was sautéing spinach and making the sauce. We put a little spinach on each plate, put a scallop on that, and topped the whole thing off with beurre blanc and some capers.

Saturday, May 22, 2010

porch drinks

We had wine for most of the courses of Tott’s dinner. We wanted to mix it up a little, though, so while we seared the tuna and sautéed the snow peas and while our guests snacked on gravlax & cucumber bites, we had a sake cocktail.

Tott kept calling them sake-tinis, but I’m not a fan of that. They’re based on a recipe we found for a drink called Green My Eyes, which is an incredibly stupid name. Whatever you call it, this is a great summer cocktail. It would be perfect for sitting on the porch or by the pool, and we will certainly be taking a bottle of sake to Dallas for the 4th of July family reunion.

We used “seedless” cucumbers, which were smaller than regular cucumbers and turned out to have seeds. Liars. I think it would be fine to use regular cucumbers.

Cucumber Fizz

3 slices cucumber
1 oz chilled sake
½ oz simple syrup
club soda

Muddle the cucumbers in the bottom of a rocks glass (or a highball glass). Fill with ice. Add the sake and simple syrup and top it all off with the club soda. Stir lightly to mix, or pour it into a shaker and back into the glass. You can garnish it with another slice of cucumber, if you’re into that sort of thing.

**These are delicious as they are, but I think I’m going to muddle a couple of mint leaves with the cucumbers next time, just to see how it goes. Not too much mint, though, because you don’t want to overwhelm the cucumber flavor.

Thursday, May 20, 2010

A cure for salmon


When I waited tables at the Parker House, the ladies loved to order salmon. Pronounced SAL-mon. Well done, please. And could you bring a glass of white zinfandel? Blech. Maybe that experience is why I hate most cooked salmon; it just tastes fishy and gross to me. But I do love smoked salmon. I actually trained myself to like it when I was in my early twenties; I'd just started dating Drew, and his family liked to have smoked salmon, capers, and cream cheese with bagels at brunch. I thought this was the height of elegance, and so I was convinced that truly cultured people liked smoked salmon. I choked down a ton of it, trying to acquire a taste for it. And you know what? I did!


Well, so since I love smoked salmon (and I know Tott does, too), I wanted to make it for her party last Saturday. Unfortunately, I don't know how to work a smoker. I'm sure Drew could make it if he tried (there's not much I think Drew can't do, other than carry a tune), but he had to work most of last week when we were getting ready for Tott's party. So smoked salmon was out, and I didn't know what to do for the third course. Then I came across a Mark Bittman recipe for gravlax--cured salmon, in other words. Well, I figured I could do that. And you know what? I could!


Cured salmon is super easy--you only need a little bit of really fresh, high-quality salmon and time. We served it sliced thin and piled on top of cucumber rounds with a little dollop of some dill-infused sour cream. Sooooo good.


Citrus-Cured Salmon
(modified from The Minimalist Cookbook by Bittman)


1 lb. fresh raw salmon
1/2 cup salt
1 cup sugar
2 tablespoons sriacha
zest of one lime, one lemon, one orange, and one grapefruit
1 tablespoon ground coriander


Combine all ingredients but salmon. Lay salmon on a clean sheet of cling wrap. Cover in salt mixtures, piling it all on there. If your salmon fillet has skin on it, pile it all on the opposite side. Wrap tightly in cling wrap (I think I put mine in a baggie). Let it rest 36 hours in the refridgerator. Rinse mixture off and dry. Slice thinly on the bias.


Sunday, May 16, 2010

aubrey approved

Last night, we had a dinner party for Tott. You see, she just finished her first year of law school. So, we came up with a killer menu – seared stuffed scallops, crab salad over avocado, cured salmon & cucumber, seared tuna, and lemon crème brulee. The nice folks at Briarwood took a look and picked out wine for each course. (The pairings were great, by the way.) We like to cook over the top, and we had an excuse.

We didn’t want people to have to stand around in the kitchen, watching us prepare each course, so we spent Saturday prepping. And what’s better than prepping all day? Prepping while babysitting!

Kaytie’s goddaughter came over at 6 AM. Luckily, even a baby knows that’s way too early to be awake, so she slept until 9:30. (So did we.) Then, Kaytie and I cooked while Aubrey made a mess and a LOT of noise. (We didn’t mind, of course, but the dogs preferred to spend the day outside.)

We had decided to serve the tuna with sautéed snow peas and pureed carrots. As I was turning the carrots into mush, I realized that I had a rare opportunity. I was making something that looked like baby food, AND I had a real live baby in the house. With just a couple pictures, I could make this food blog a whole lot cuter.


Anyway, these are the best carrots you’ll ever eat. Even Alice, who was scarred by a childhood memory of Mickey Mouse and some carrot cake, ate all of her carrots. They’re that good.

Ginger Pureed Carrots
(serves 4-5)

1 lb baby carrots, cut in half
1 Tbs brown sugar
1 Tbs minced fresh ginger
½ cup chicken stock
½ tsp salt
5 Tbs butter
¼ cup heavy c ream

Over high heat and in a covered pot, simmer the carrots, sugar, ginger, salt, and chicken broth for about 12 minutes, until the carrots are fork-tender.

Puree the mixture with the butter and cream in a food processor until it is the consistency of baby food. You may want to season with a little more salt.

You can make this ahead of time and keep it in the fridge. Reheat in the microwave for 4 minutes or so, stirring once half way through. Make sure it's not too hot if you're going to feed it to a baby.

Thursday, May 13, 2010

quick & easy

We had Kaytie’s parents (Kathy & Eddie) over Sunday night to celebrate Mother’s Day. Since I had been working the busiest lunch all year from 9 to 4, we needed an easy meal. Easy and delicious.

Our go-to meal? Boiled shrimp. It’s one of Eddie’s specialties – he also fries a mean piece of deer meat, but only when Kathy’s out of town. Anyway, Kaytie has learned the recipe well, and now you can, too.

For sides, we had boiled potatoes, blanched asparagus, and grilled corn.

Eddie’s Boiled Shrimp

raw, unpeeled, headless shrimp (roughly 1 lb per person)
water
crab boil (found by the spices at the store)
1-2 lemons, cut in half
1 onion, quartered
salt

Fill a large pot ¾ full of water. Add crab boil to taste – Kaytie usually uses two capfuls.

If you have bought frozen shrimp, which we usually do, thaw it out. We put the shrimp in a colander and run cold water over it, and this thaws it pretty quickly.

Bring the water to a rolling boil. Add the shrimp, lemons, and onion – this will stop the boiling.

Let the water return to a boil. When it does, boil for 1 minute.

Turn off the heat and add a generous amount of salt. (This makes the shrimp easier to peel.)

Let the pot stand covered for 5 minutes.

Drain the water off, and dump the shrimp over ice, which will stop them from overcooking themselves.

Serve with…

Drew’s Delicious Cocktail Sauce

1 ½ cups ketchup
1-2 Tbs horseradish to taste
juice of 1 lime
1-2 Tbs Sriracha hot chili sauce
1 heaping Tbs honey

Mix together, chill, and serve.

one from the vault: best corn ever

We’ve made this several times. It’s been served alongside grilled dove, boiled shrimp, and roasted pork shoulder. It’s also been a hit every time.

Grilled Corn on the Cob

fresh corn, in the husk

Soak your corn for about 10 minutes. Remove the silk. I carefully peel back the husks about half way to make sure I get as much of the silk off as possible. “Re-husk” the ears of corn so they are covered again. Soak the corn for another 5 minutes. This soaking will get some water into the husks, which will kind of steam the corn on the grill. It’ll also help keep the husks from burning.

I use a gas grill on medium-high heat. Put the corn on, close the grill cover, and grill for about 5 minutes. Rotate the ears, close the cover, and cook for another 5 minutes.

Here’s the brilliant part. (Also, a little dangerous.) You’re going to quickly peel off the husks and return the corn to the grill. I say quickly because they’re hot. I recommend wearing a pair of leather gloves. (You might want a pair of latex gloves underneath, too.) You still need to work quickly, though, because there is steam and hot water inside the husks, and your gloves are gradually going to get wetter and hotter.

All this risk of steamed palms is worth it, though. When you return the husked corn to the grill, you’re going to caramelize the kernels. Keep watch and turn them frequently until the kernels are golden brown.

Grilled corn is delicious on its own, but it’s even better with…

Blue Cheese Compound Butter

3 sticks butter, room temp
2 Tbs Dijon mustard
1 Tbs fresh thyme, finely minced
pinch of salt
½ lb crumbled blue cheese

Gently mix everything together in a bowl. Add more salt if needed. This is best served at room temperature.